Kaltura - Popular video platform for remote learning and meetings
I bet Kaltura is familiar to especially college students who had online course experiences. As a video hosting service, it can upload and embed videos into university courses and company training.
According to the CEO of Kaltura, it “offers the most open, flexible, and collaborative video platform in the market, catering to any video use case and helping to democratize media and make it accessible and impactful for so many organizations and people around the world.”
What Can I Use Kaltura for?
- Record your screen and webcam with the screencasting feature built-in if you want to record yourself talking or demonstrating something, record a lecture on PowerPoint, and capture tutorials.

- Upload videos you already have or you just recorded into Kaltura. It supports various media types that you can upload any kind of videos and allows you to edit the video description or the content.
- Edit videos with the editor with sophisticated settings for free.
- As a private lecture and meeting program without ads, the videos are just available to you and your audience. For viewers with poor connection, the video will adapt and stream a lower-quality definition of the video recording.
Overview of the article:
# How to Download Kaltura Videos from Blackboard to Your Computer?
You had your lessons online and want to download a copy of the video from Kaltura? This is a good practice to save the videos locally so you can playback them without losing them once you want to revise the content.
It is super easy to download Kaltura videos to your computer from Blackboard. But the download option is just available to people who have access to watch the course in Blackboard.
Let me show you how:
1. Log in to your Blackboard.
2. From the My Institution page, click Kaltura My Media tab → My Media.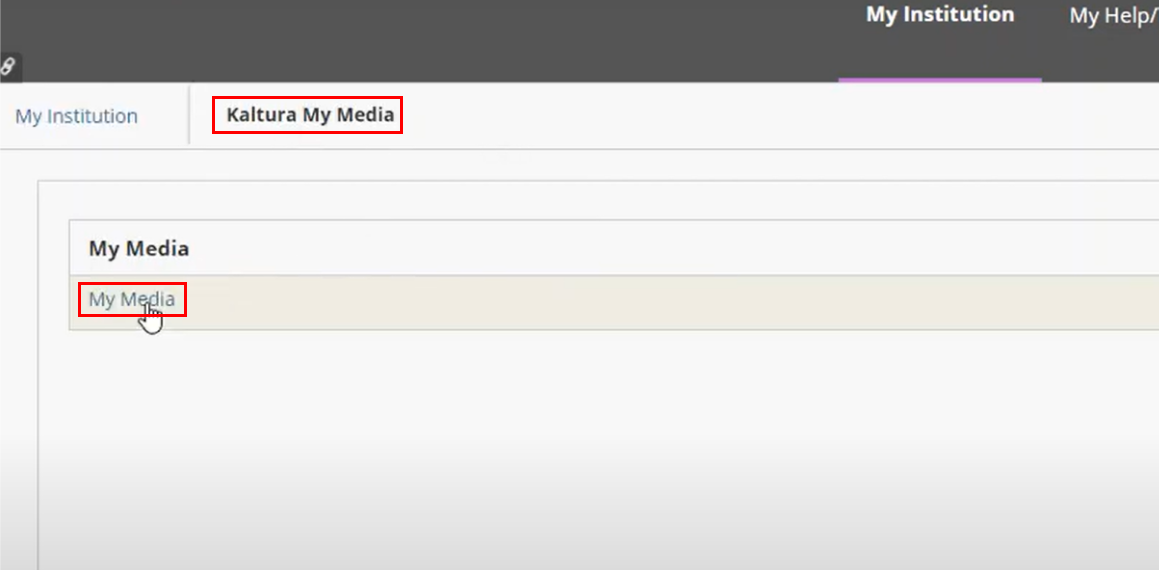
3. Navigate to the video you want to download. Click the edit icon on the right hand instead of clicking directly the video title.

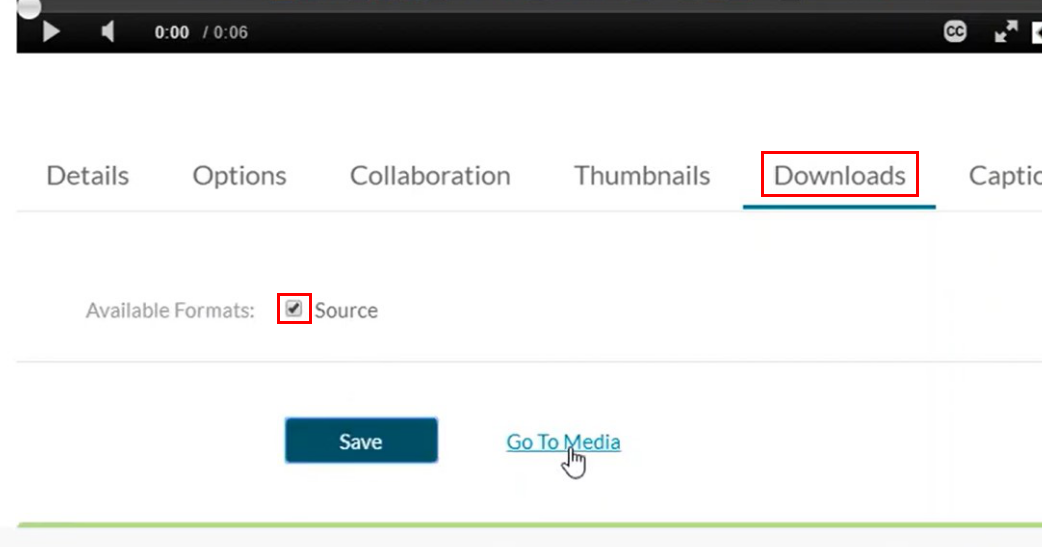
4. Under the Downloads tab, check the source option and click Save → Go to Media.
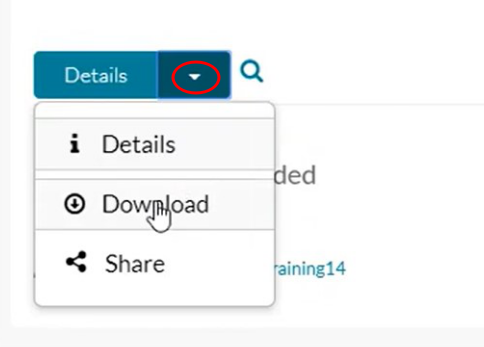
5. Click Download in Details.
6. Click the download icon and it starts to save the video. You’ll find the MP4 file in the folder.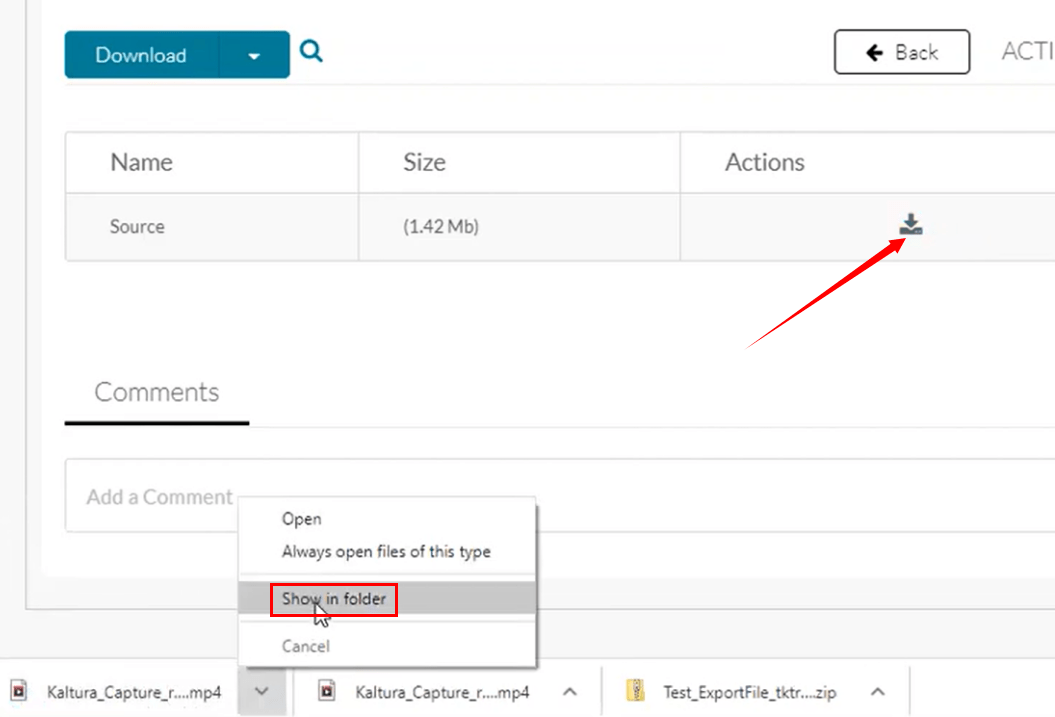
# Download with A Useful Kaltura Video Downloader Software
The above method can solve most students’ problems, but some videos that we want to download are not available to everyone. So, for videos that cannot get with the first method, I recommend trying a practical Kaltura video downloader - iFunia YouTube Downloader.
The time you hear the name of this software, you may think it’s for YouTube, yes, it’s for YouTube video download, but not only, it can also download videos from hundreds of websites and streaming platforms including Kaltura, Facebook, Reddit, TikTok, Dailymotion, and so on.
Predominant Features
- Download Almost Any Video. As a video downloader, iFunia allows one to download videos and embedded videos from all kinds of websites, platforms, and even live streams without limit. If you have regular video download needs, a professional downloader is quite necessary to help you save time.
- Used as A Video Player. Once the videos are downloaded, you can directly play them in the software without opening another media player.
- Efficient Batch Download. This function enables you to download 10, even 50 videos at a time. You leave the program running in the background, meanwhile, you do your own business without being disturbed.
- Keep Original Quality. Save videos in a large variety of resolution options, from 176p to 4K, even 8K, according to your original video quality.
- Fast Processing Speed. With the simple interface and steps and fast multi-stream processing, you can get your videos soon, but it depends also on the length and the resolution you chose for the video.
- Popular Output Formats and Devices. It lets you download videos in popular formats, including MP4, WebM, MOV, and others (the output format options vary with the videos you upload).
 Free Download macOS 10.13 or later
 Free Download Windows 11/10/8/7
 Procedures to Download Kaltura Videos on Mac or Windows:
- Free download and open iFunia YouTube Downloader.
- Find the Kaltura video you want to download, and copy the URL of the site that contains the embedded Kaltura video.
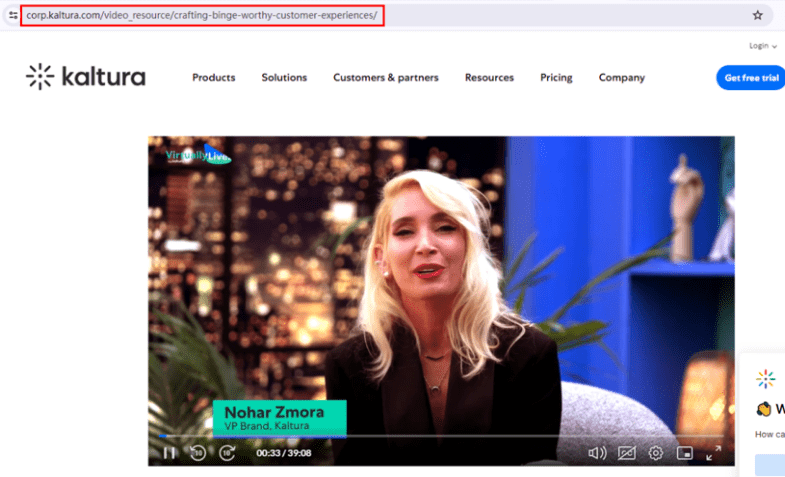
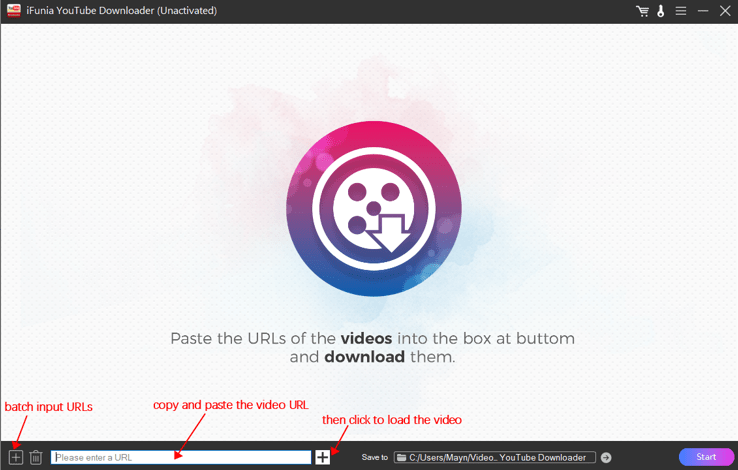
- Paste the URL into the address box and click on ➕ at the right of the address box to upload the video.
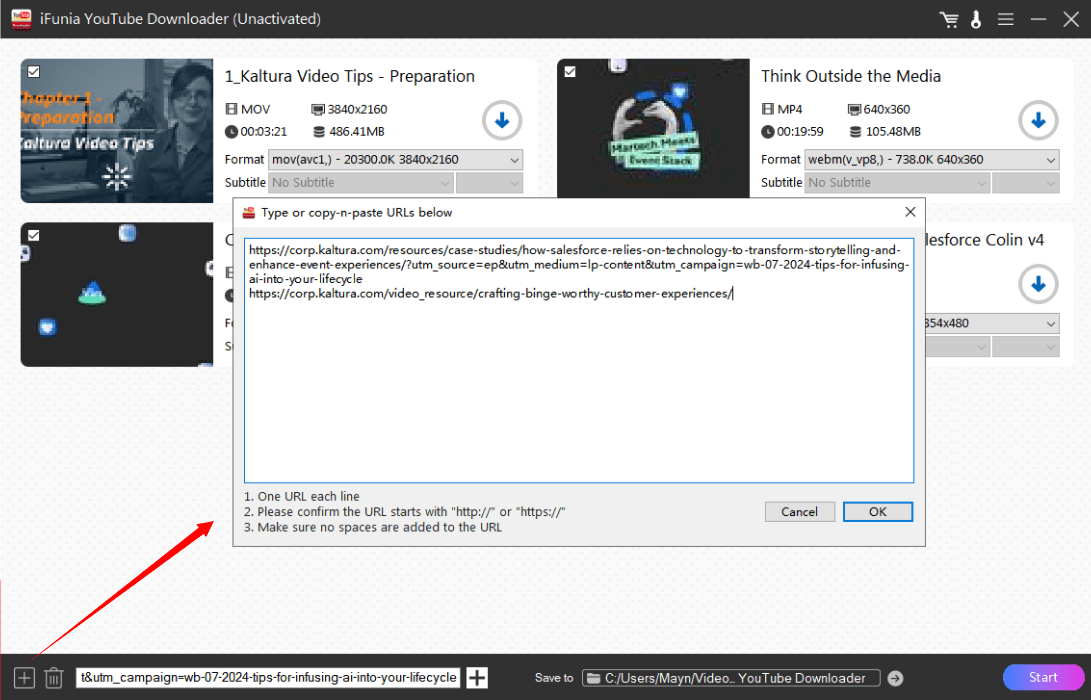
- To batch input the videos, click the ➕ at the left of the address box and it’ll show the window where you can add multiple video URLs.
- Choose an output format. As you can see, there is a list of format options according to every video.
* Tips for choosing the format:
Normally, MP4 is the most popular format to be played on various devices and players. For MP4, there are different resolutions to choose from, select a bigger one if you want a higher definition of the picture and the sound, and select a smaller one if you want a smaller file size and a faster download speed;
MOV is an Apple file format for QuickTime;
WebM is an ideal format for streaming and uploading videos on the web;
3GP requires low storage and bandwidth which is good to be used on mobile devices.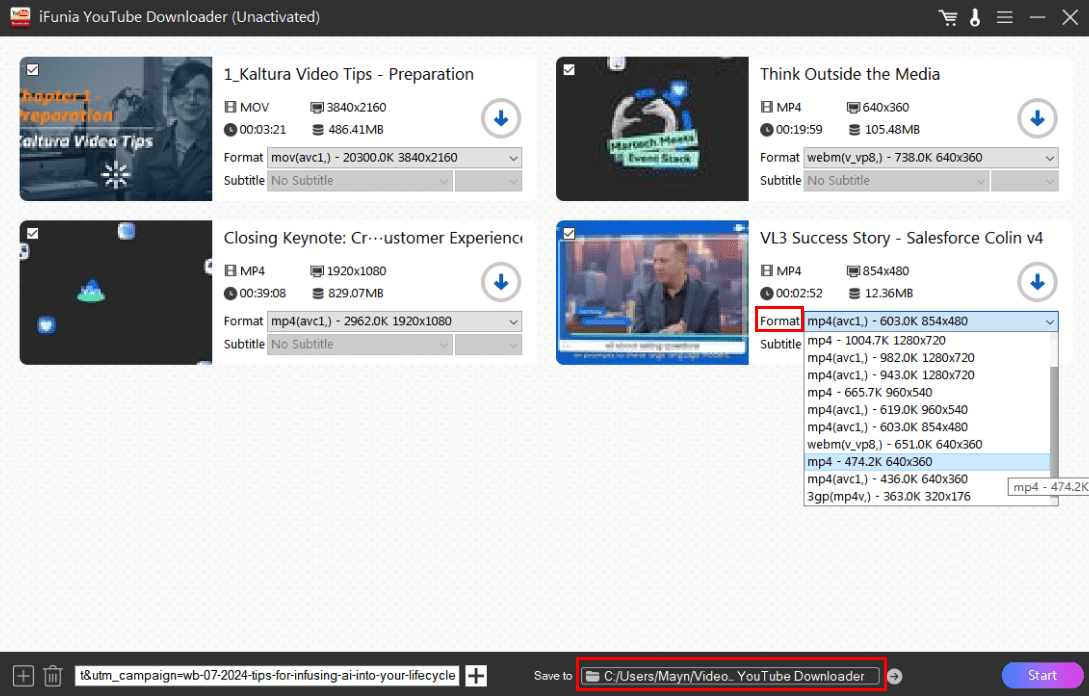
- Then decide where to save the videos by clicking the bottom folder and hit the Start button to begin the downloading.
* Note: You can use the trial version to free download 3 videos. If you are satisfied with the results, then you can have a license to download videos from not only Kaltura but plenty of other platforms without limit.
# How to download Kaltura Videos using FFmpeg?
The two above methods can solve your problems, but I noticed that quite a number of people mentioned using FFmpeg on forums. So, I’ll introduce another way to download Kaltura Videos for those who always tend to find a solution by using Command Lines.
However, this method is a bit complicated, you can have a try, if you cannot figure it out please leave us a message and we can discuss it together. Besides, the quality and the download speed of this way are not as good as a professional downloader.
Guide with pictures on how to download Kaltura lecture videos:
- Download FFmpeg and extract all the files.
- Find the Kaltura video and open the Inspect by right-clicking on the page.
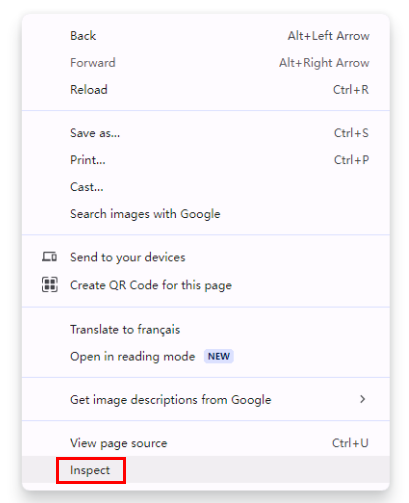
- Use the shortcut Ctrl + F to look for “pid_kplayer” as below.

- Double click and copy the link after scr=“, and paste it on a Word or a Text document.
Open the FFmpeg file, find a file called “bin”, and copy the three exe. programs directly into the Downloads folder. Open Command Prompt by searching “cmd” on Windows or Terminal on Mac, type "cd Downloads" and press Enter.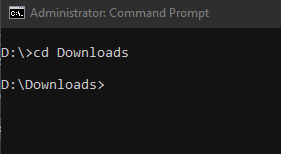
Go to the document you pasted the link, type ffmpeg -i " before it, and " -c copy lecture.mp4 after it as in this picture.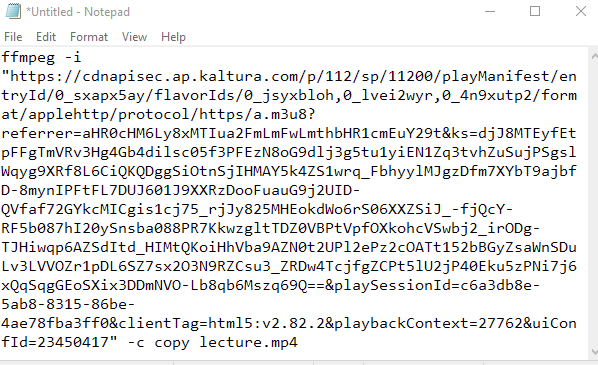
- Copy all the content and paste it into Command Prompt and the Kaltura video will be downloaded to the Downloads folder, but it will take some time to finally get your video.
# Download Kaltura videos with a web extension
Without download and installation, the usage of a browser extension is convenient and efficient. The Chrome plug-in I recommend here is KalDown, this add-on helps you download videos embedded using Kaltura player.
The problem with extensions is that they are not stable and usually not safe. They can get site data and menace our information security. In addition, sometimes, the page becomes unresponsive and says no video found, you may refresh for the extension to work properly.
Let me show you how:
1. Add KalDown to Chrome.
2. Find the Kaltura video or the page embedded in the video.
3. Click the extensions button beside the site address and find the addon KalDown.
4. Then it lists the download options with different output formats and resolutions. Choose one and hit Download. After a few minutes, you can find the video in the downloads folder.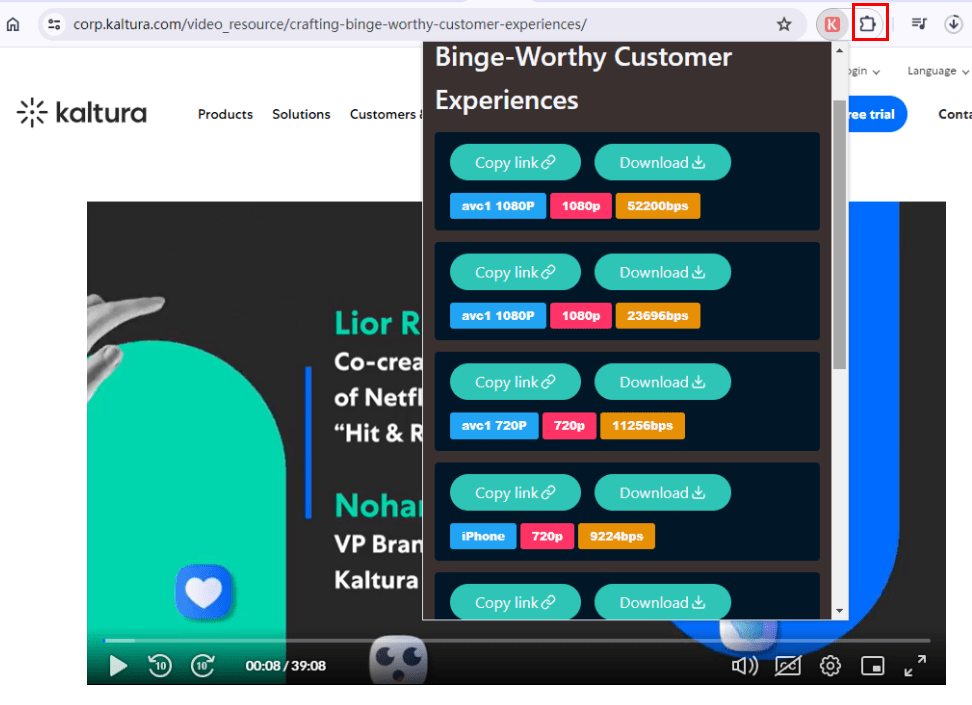
# Bonus: How to Record And Edit A Kaltura Video in Canvas?
If you are a demonstrator who wants to record a presentation and upload it to your audience, Kaltura Capture is a free and efficient tool to help you accomplish the task.
After introducing a few methods to download Kaltura videos, in this part, I’ll share a method to record and edit Kaltura videos in Canvas, which is practical for people who want to give a presentation.
How do I record and edit with Kaltura in Canvas?
Record Part:
- Log into Canvas and navigate to My Media.
- In the Add New tab, choose Kaltura Capture in the drop-down list.
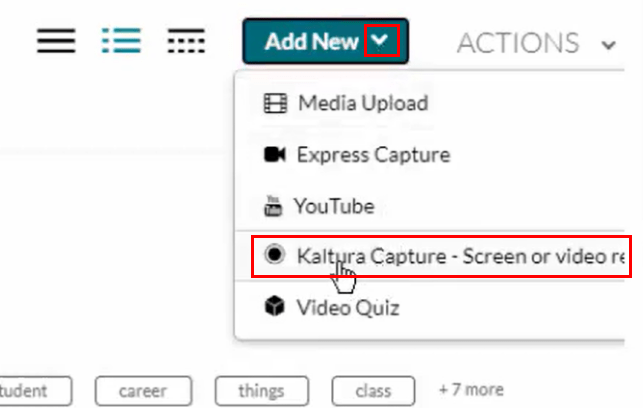
- If you’ve never installed the recorder before, choose Download for Windows or for Mac, then in the appearing window, you click Open URL.
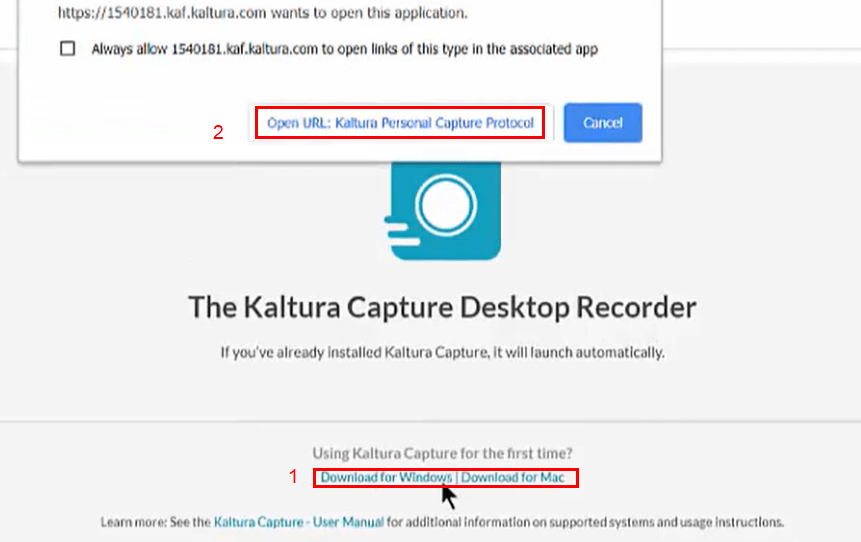
- Then Kaltura Capture will launch from your computer.
Recording settings: turn on the Camera to show yourself speaking; if you want to present the content on your Screen, choose between Full screen and Select Area; in the Audio tab, select the audio source to give the best audio quality.
- All set up, click the red record button and it’ll show a short countdown. Don’t worry about if you are prepared after the countdown as you can edit the video later.
- You can stop the recording, pause the recording, cancel the recording, and hide the control panel by clicking the small horizontal line.

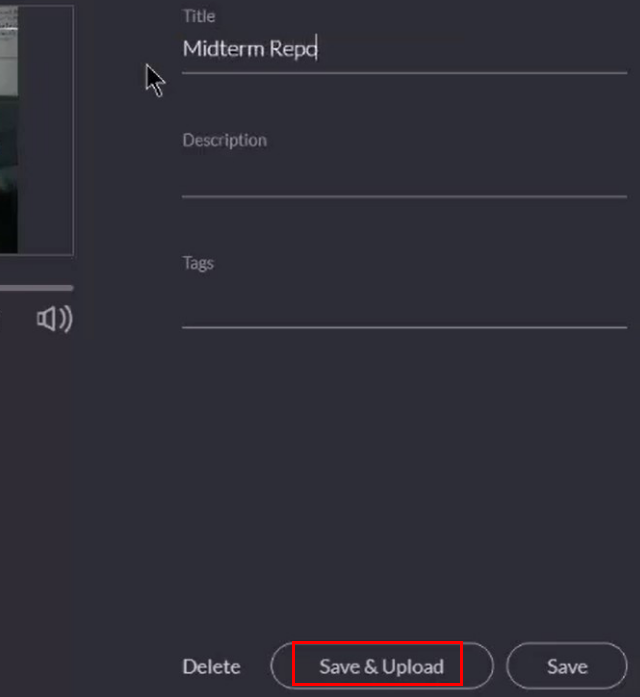
- Once finished, rename and describe the video for better searching afterward. Click Save & Upload to share your video or if you want to edit it. Save it to save the video locally on your computer.
Edit Part:
- Find the video in My Media and click the pencil icon to edit.

- There are some setting options that you can define on this page. Navigate and modify the video description and information, don’t forget to save it under the Details tab. Next, find the Launch Editor button.

- You can now edit the video content. There are lots of tools, try them and you can undo any step.
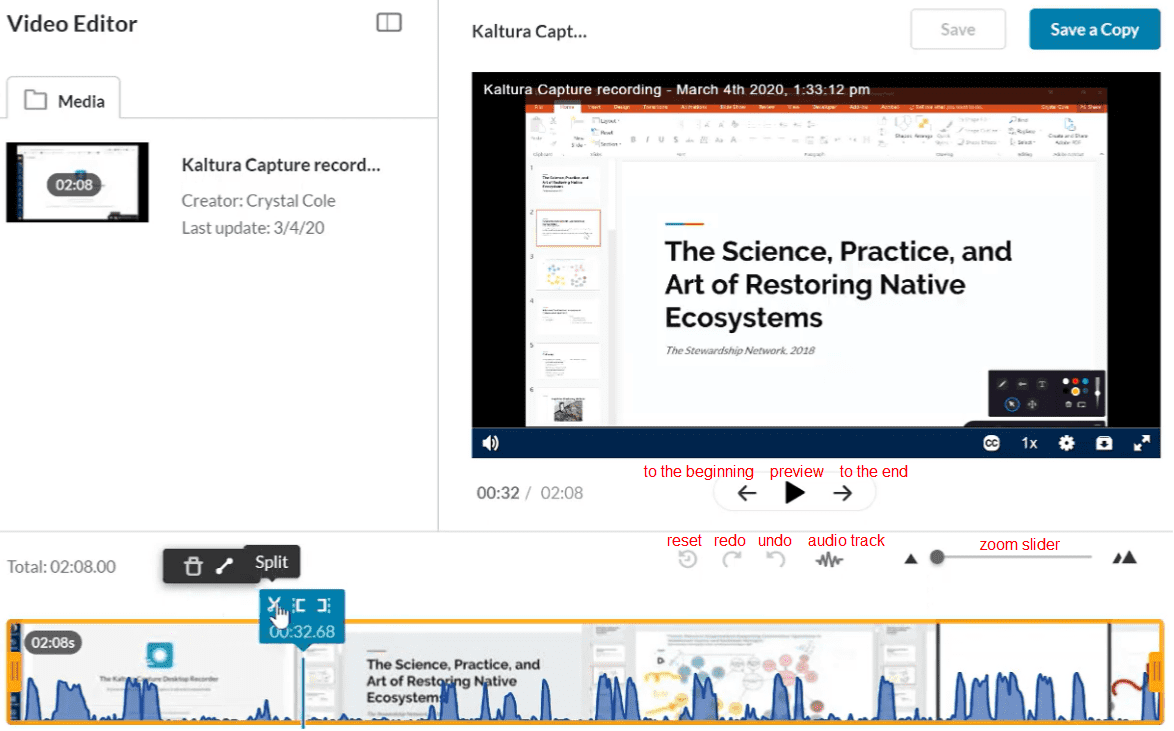
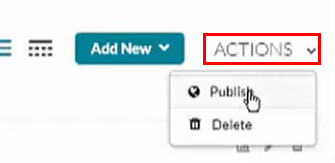
- Click Save at the top-right corner, you can find the video in My Media. If you want to publish it, choose the video, and under the Actions tab, click Publish.
To review
After reading the whole passage, you may get clear about how to download a Kaltura video with the method that suits and pleases you the most, or, you may get confused about choosing which way. So, here’s my advice:
- For videos that can be downloaded from Blackboard/Canvas, use the first solution;
- For other videos, use the second solution.

Chloe LEE is good at explaining and solving complex technology problems to her readers. Since joining iFunia Studio, she has focused on writing articles about video and DVD software, and how-to tutorials.


 Free Download macOS 10.13 or later
 Free Download Windows 11/10/8/7


