
An ISO image file is an identical copy of an optical disc like DVD and CD, containing everything that would be written to the disc. Many software packages and operating systems are also distributed as ISO files.
If you have an ISO image and want to burn it onto a DVD for backup and easy access, you’ve come to the right place. In this article, we’ll show you the step-by-step process of burning ISO to DVD using Windows or Mac’s built-in tools as well as capable third-party programs.
 Free Download Windows 11/10/8/7
 Free Download macOS 10.11 or later
Both Windows and macOS have built-in support for burning ISO image to optical disc. So in most cases you can simply burn ISO image to DVD using these built-in ISO burner tools.
Windows Disc Image Burner is an ISO burning software developed by Microsoft and preinstalled in Windows 11/10/8/7 that can help you create DVD from any ISO file. Steps to burn an ISO to DVD on Windows:
1. Insert a blank DVD into the DVD drive of your computer. Make sure it’s a brand new DVD if you want to burn a bootable DVD from an ISO image.
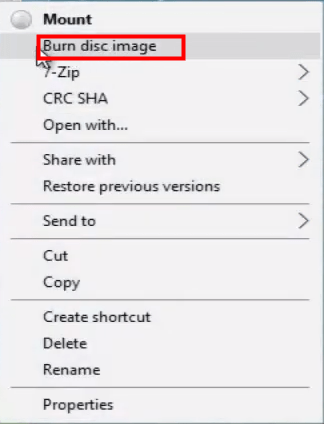
2. Right click on the ISO file and select “Burn disc image” option. On Windows 7, just double-click the file.
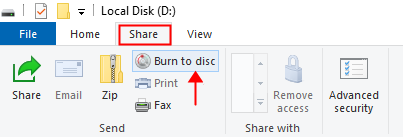
3. In the pop-up box of Windows Disc Image Burner, your DVD burner drive should be selected as the “Disc burner”. Or you can select the correct one from the drop-down menu.
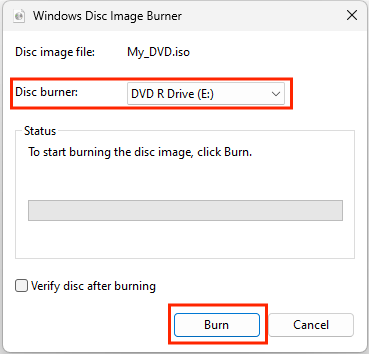
4. Click “Burn” to start burning the ISO image file to DVD on Windows. It will show you a progress bar.
It’s optional to check the “Verify disc after burning” option, which will check if the data written to the DVD matches the original file.
Disk Utility used to be the best option for burning ISO to DVD on Mac, but Apple has removed its burning feature since OS X El Capitan 10.11. Instead, now you can burn an ISO file to DVD directly from the Finder on Mac, easy and fast. (If you’re using older Mac OS X before 10.11, you can see the FAQ section to learn how to burn with Disk Utility.)
1. Insert a blank DVD into your DVD burner drive.
2. Locate your ISO file in Finder.
3. Right-click on the file and choose “Burn Disk Image xxx to Disc”.
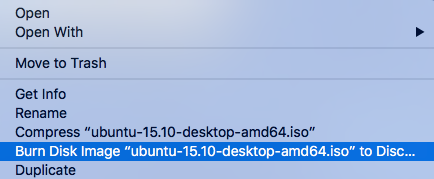
Or alternatively, you can select it and go to the menu bar on the top of the screen and select “Burn Disk Image xxx to Disc” from the File drop-down menu.
4. That’s it. Wait for your Mac to finish burning ISO to DVD.
If you can’t find the Burn Disk Image selection from the menu, you can try to burn ISO to DVD from command line or use a third-party app below.
Did you know that you can burn ISO to DVD with a simple command? All you need to do is open the command-line software on Windows or Mac and use the underlying ISO burning tools mentioned above directly. So there’s no more right-clicking or burn option missing problems.
1. Insert a blank DVD or CD into your computer’s disc burner.
2. Launch the Command Prompt. (You can easily find it by clicking Start and type “cmd”.)
3. Enter the following command-line syntax and press Enter:
ISOBURN.EXE /Q <drive letter>: Path\To\Filename.iso
Examples:

The /Q syntax is optional. If you use it, isoburn.exe command will start burning the ISO to DVD immediately as long as the path is correct and a DVD burner is available. If you don’t use the /Q, the Windows Disc Image Burner box will pop up and wait for you to burn manually as in the first method.
1. Insert a blank DVD into the DVD drive of your Mac.
2. Put the ISO file somewhere easy to locate, like the Desktop.
3. Open Terminal. You can access it by pressing Command+Space and type “Terminal” and press Enter.
4. Type the following command line and press Enter to run it:
hdiutil burn ~/Path/Filename.iso
Example:

Then your Mac will start burning DVD from the ISO file without displaying any dialogue. Hdiutil is a powerful command line utility in macOS to manipulate disk images such as ISO and DMG files. Besides burn disk images to DVD/CD, it can also help you create, verify and convert them.
While Windows and Mac do come with built-in ISO burning tools, you might still consider using third party programs to burn ISO files to DVD. Why? Native tools are generally reliable, but errors can occur due to varied system settings of each device. Second, there’s a chance that the ISO file will only work on the OS it was burned on if you use built-in tools. In other words, if you burn an ISO to DVD using Windows Disc Image Burner, the image may not work on a Mac, and vice versa.
Third-party programs, on the other hand, are not affected by this and often let you burn ISO to DVD in a more intuitive way and provide additional features you may need, making it easy for users of all skill levels and operating systems to burn ISO file to DVD without hassle.
iFunia DVD Copy is a top option for creating DVDs from ISO image, DVD folder and DVD disc, and it’s compatible with both Windows and Mac OS. It lets you burn any ISO image file to DVD in a more intuitive way and provides faster burning speeds and better stability compared to the built-in tools.
Besides burning ISO to DVD, it can also create ISO image from DVD disc and local DVD folders. If you need need to copy a DVD, you can burn it directly to another blank disc without having to copy it to ISO image first. Now you can follow instructions below to burn an ISO image to DVD using iFunia DVD Copy:
1. Download and install iFunia DVD Copy on your computer, then launch it.
 Free Download Windows 11/10/8/7
 Free Download macOS 10.11 or later
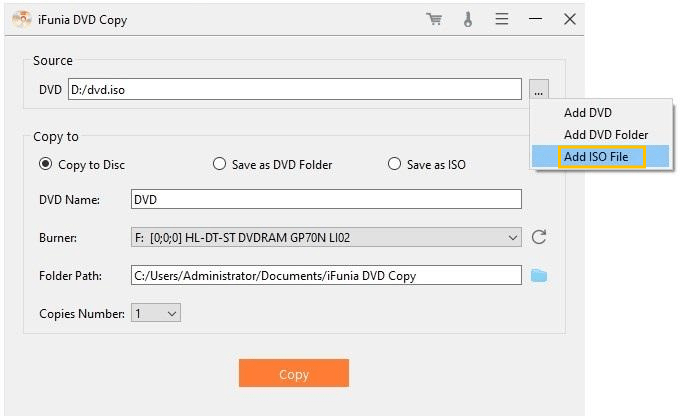
2. Click the three-dot icon in the Source box, and select “Add ISO File” option to import the ISO image you want to burn.
3. Select “Copy to Disc” mode.
4. Make sure there’s is a blank DVD disc in your disc drive and select the correct burner.
5. Click on the “Copy” button to start burning ISO to DVD.
![]() Tip: If you have diverse burning needs, such as burning video to DVD to create a playable DVD, use iFunia DVD Creator. It can not only burn ISO to DVD, but also create ISO image from videos and burn videos to DVD. It also allows you to add a DVD menu and customize the background image and music.
Tip: If you have diverse burning needs, such as burning video to DVD to create a playable DVD, use iFunia DVD Creator. It can not only burn ISO to DVD, but also create ISO image from videos and burn videos to DVD. It also allows you to add a DVD menu and customize the background image and music.
CDBurnerXP is a popular free disc burning program that can burn ISO image and VIDEO_TS folder to DVD. It can also convert other image files to ISO. This ISO burner supports all kinds of discs including CDs and Blu-ray discs. It’s now compatible with Windows 10 or lower versions and offer a multi-language interface.
Follow steps below to burn ISO to DVD on Windows using CDBurnerXP.
1. Download CDBurnerXP from its official website www.cdburnerxp.se
2. Insert a blank DVD into your drive first, then launch the program.
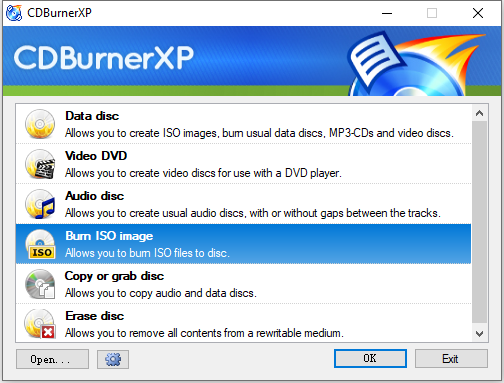
3. Choose “Burn ISO image” selection and click “OK”. A dialog pops up.
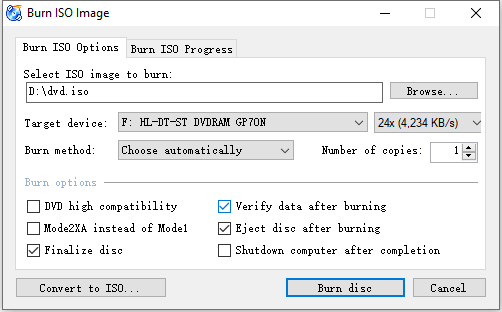
4. Click “Browse” to select the ISO image to burn.
5. Choose your DVD drive as the “Target device”.
6. Select “Burn options” based on your needs. Or leave them as defaults if you’re not an advanced user.
7. Hit “Burn disc” to begin the ISO to DVD burning process.
Burn for Mac is a lightweight and free disc burning app, it can burn almost anything to DVD, including ISO image, videos and audio files. It can also burn a video DVD, data DVD and audio CD. Here is a simple guide to burn ISO to DVD using Burn:
1. Download Burn from its official site. It supports macOS 10.9 and above.
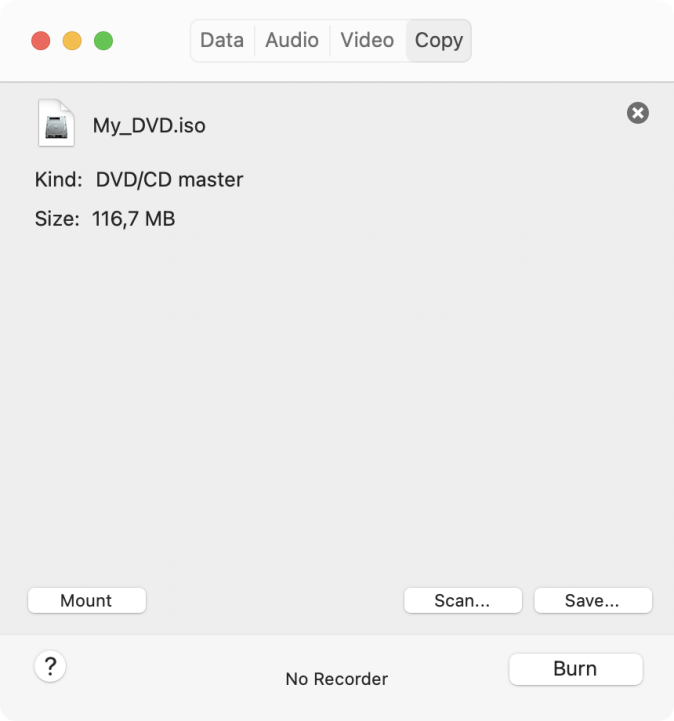
2. Open it, and click the “Copy” tab.
3. Drag and drop your ISO image to the interface.
4. Insert a blank DVD or CD into your disc drive, which should be displayed at the bottom of the interface.
6. Click the “Burn” button to start burning ISO image to DVD on Mac.
You can choose according to the ISO file size. A standard DVD-R disc can hold around 4.3 GB of data and has a great compatibility and cheap price. If your ISO image exceeds that capacity, you can opt a dual-layer DVD, such as DVD-R DL with a capacity around 8GB. If you have a small ISO file of only a few hundred MB, you may also use a CD, which can hold up to about 700 MB of data.
Yes, if the ISO file contains a bootable operating system or software. Both built-in tools and third-party ISO burners can burn ISO to DVD and make it bootable. Likewise, you can also burn ISO image as a video DVD and make it playable on DVD players.
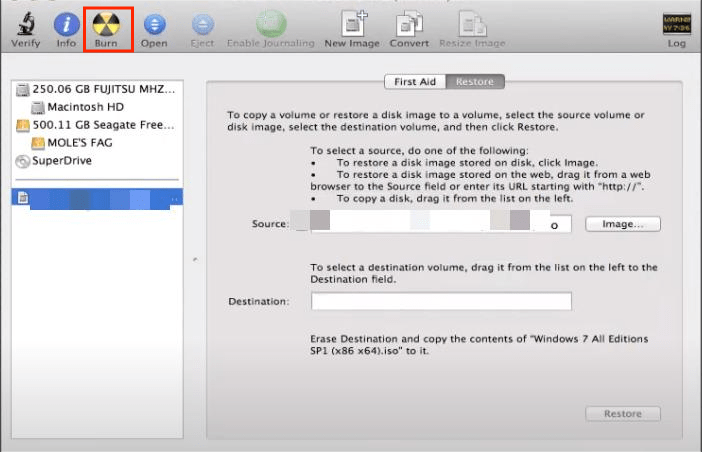
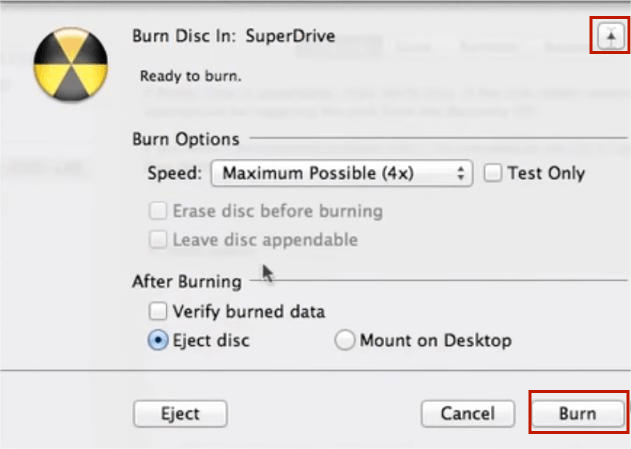
Users running macOS before 10.11 can still use Disk Utility for burning ISO to DVD on Mac. Here is how it works:
In conclusion, you can burn ISO to DVD or other optical discs easily using built-in tools on Windows and Mac. But when you have problems with these built-in methods, third-party programs recommended above can be useful alternatives and provide you with an easy solution.

Chloe LEE is good at explaining and solving complex technology problems to her readers. Since joining iFunia Studio, she has focused on writing articles about video and DVD software, and how-to tutorials.