
Want to create copies of your favorite DVD movies or back up homemade DVDs to preserve cherished memories? Well, you’ve come to the right place if you want to accomplish this task on a Mac. In this article, we will guide you through the process of copying DVDs on Mac to ensure that you can duplicate your DVD collection regardless of technical skills, including DVDs with copy protection.
Important Note: Copying and distributing copyrighted DVDs is considered illegal. Make sure you have the necessary permissions and copy DVDs for personal archive purposes only.
 Free Download macOS 10.11 or later
 Free Download Windows 11/10/8/7
Before we dive into how to copy a DVD on a Mac computer, let’s see what you need to prepare and figure out in advance.
#1. Does your Mac have an optical DVD drive? Macs don't come with built-in DVD/CD drives after the MacBook Pro 2012, so you may need to buy an external SuperDrive to read and copy DVDs.
#2. Prepare some blank DVD discs. DVD-R is the most compatible format for DVD players and is inexpensive. For disc capacity, choose a DVD-5 (4.7GB) or DVD-9 (8.5GB) disc depending on your original DVD.
#3. Is the DVD you want to copy homemade or copy protected? Commercial DVDs have various copy protection schemes to prevent unauthorized duplication. You’ll need to use a third-party DVD copy software with decryption capability to copy your purchased DVDs. For an unencrypted home DVD, you can copy it easily using the built-in Disk Utility app.
iFunia DVD Copy for Mac is a dedicated DVD copy software designed to copy any DVD to DVD or hard drive on Mac. It can bypass various copy protections such as CSS, region codes, Sony ARccOS, UOPs, etc. and perfectly clone commercial DVD movies and TV shows, be it old or new. With this DVD copy software, you can copy all DVD content or save certain part of the DVD under a custom mode. Whether you want to copy a self created DVD or a purchased one, iFunia DVD Copy can be an optimal choice.
Step 1. Click the Download button below to install iFunia DVD Copy for Mac.
 Free Download macOS 10.11 or later
Step 2. Insert the DVD you want to copy into the DVD drive.
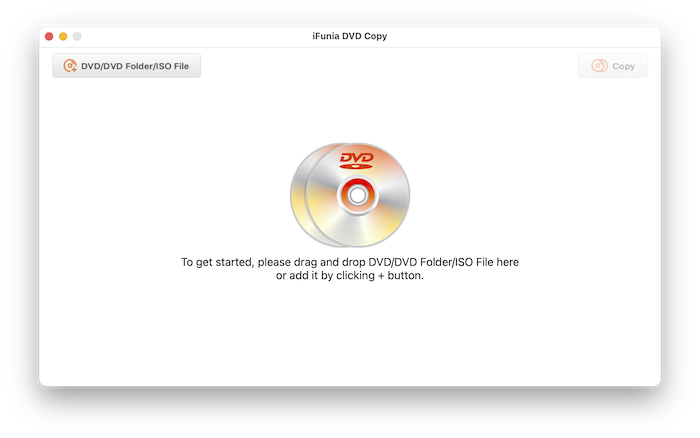
Step 3. Open the app, click the  button in the upper left corner to add the DVD. Or you can just drag and drop the DVD to the interface.
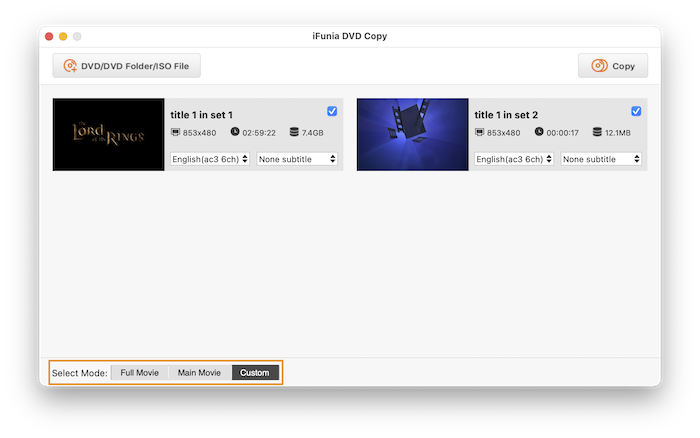
Step 4. Select a DVD copy mode.
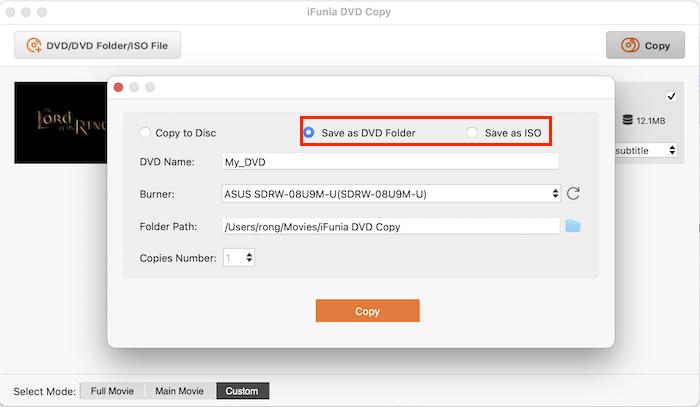
Step 5. Click the  button to bring up a new window. Select “Save as DVD Folder” or “Save as ISO” to save the copied file to computer. And click “Copy” to begin the process. (If you have two DVD drives connected to your Mac, select “Copy to Disc” here to copy the DVD directly to another one on the fly.)
Step 6. When the process is complete, eject the original DVD disc and insert a blank DVD.
Step 7. Relaunch iFunia DVD Copy, add the copied DVD folder or ISO file into the program, and choose “Copy to Disc” this time. Then click the “Copy” button again to make a new DVD copy.
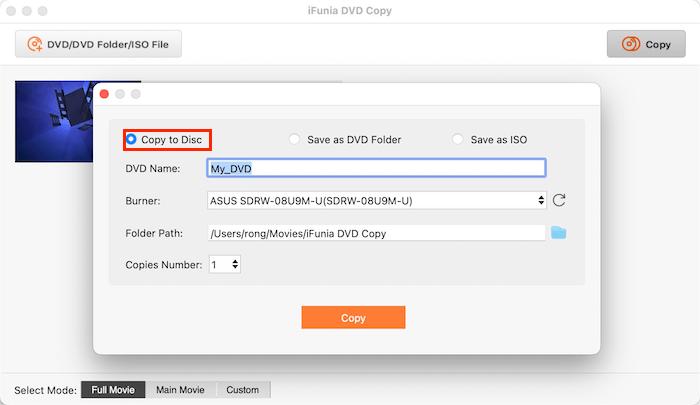
Tip: If you need to make multiple copies of the DVD, select the number from the “Copies Number” drop-down and it will prompt you to continue once it completes a copy.
Another way to copy encrypted DVDs on Mac is to use the combination of a DVD ripper and a DVD burner. MakeMKV is a free and cross-platform DVD ripping software that can save DVD to MKV files, including multi-track MKV. And Burn is a free disc burning software for Mac, capable of writing any file to DVD, including DVD video.
However, note that this method cannot capture and copy DVD menus. So if you want to copy the entire DVD file structure, use method 1 to create an unencrypted DVD or ISO file.


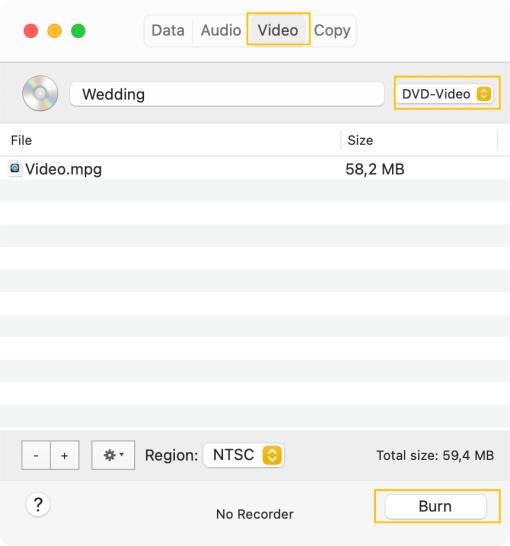
Tip: As you may have noticed, Burn has a copy mode, but it can only copy unencrypted DVDs. So you can also use it to copy homemade discs. Just switch to the "Copy" tab and save the DVD to an ISO file, then burn it to a blank DVD.
*For DVDs without copy protection only
Disk Utility is a system app that comes with all Macs and is designed to better manage your hard drive and resolve disk issues. Although Apple removed its disc burning feature since macOS 10.11, Disk Utility can create a disc image copy from unencrypted DVDs. Then you can use Finder to burn the image file to another DVD. This way, you can copy the entire DVD contents and structure without a third-party software.
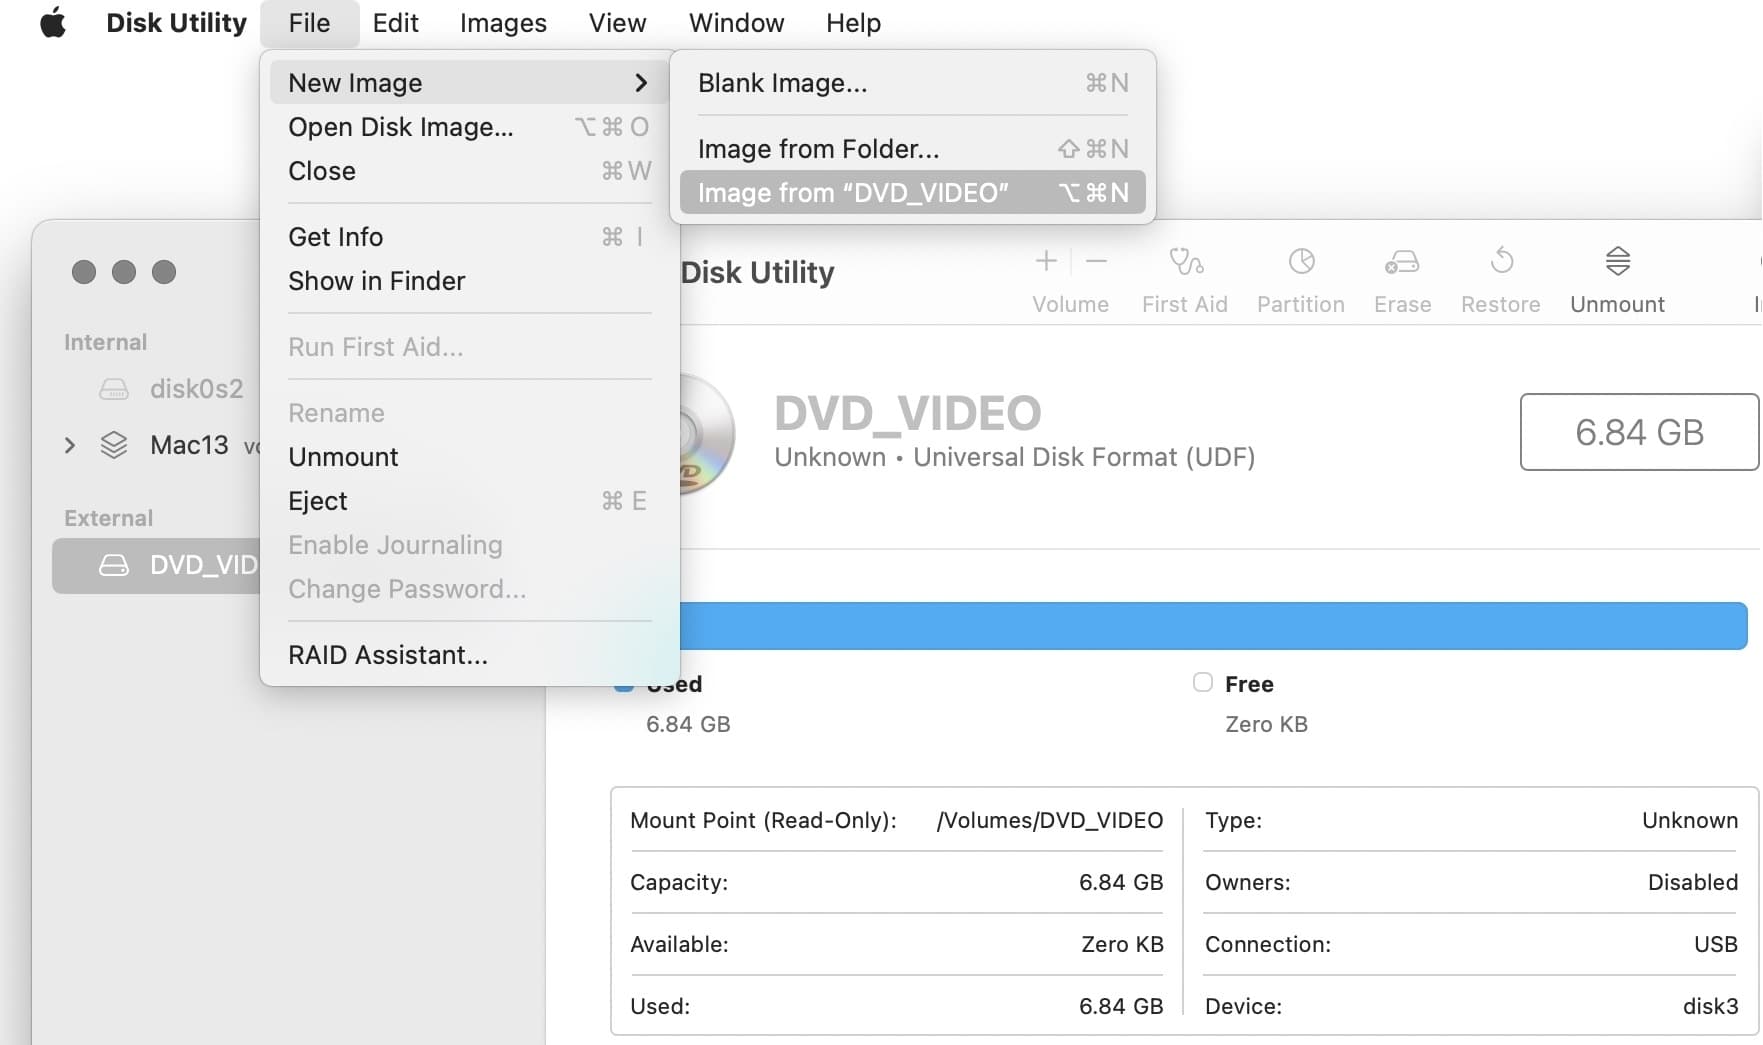

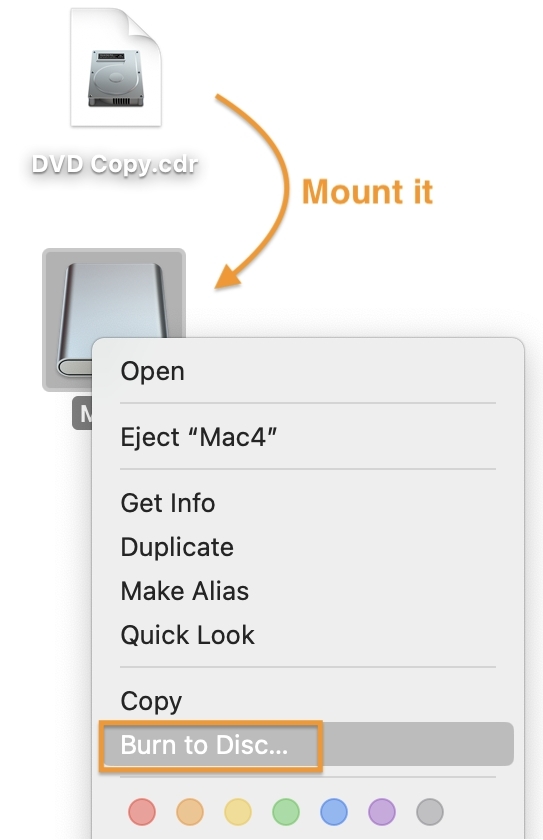
Note: if you’re running an older Mac version prior to OS X 10.11 El Capitan, you can still use the burning feature of Disk Utility. Just relaunch Disk Utility and choose "Images" > "Burn".
Which is the best way to copy DVDs on Mac? Here is a comparison of the main features of each method. Choose the one that suits you best.
| iFunia DVD Copy | MakeMKV+Burn | Disk Utility | |
|---|---|---|---|
| Apply to | macOS 10.11+; Windows | macOS 10.9+ | All Macs |
| Difficulty | Easy and intuitive | A bit complex | Easy |
| Bypass copy protection | √ | × | × |
| 1:1 DVD copy | √ | √ | √ |
| Copy part of DVD | √ | √ | × |
| Copy DVD to disc image | √ | × | √ |
| Copy DVD to DVD Folder | √ | × | × |
| Play DVD video | √ | × | × |
For users who want to copy DVDs to their Mac hard drive, the best option is to rip and digitize the DVD for easy playback and preservation.
To copy unencrypted home DVDs, simply right-click on the DVD and choose “Copy” from the list. Then your Mac will start copying the DVD to a DVD folder with VIDEO_TS and AUDIO_TS folders in it, and save it to the desktop.
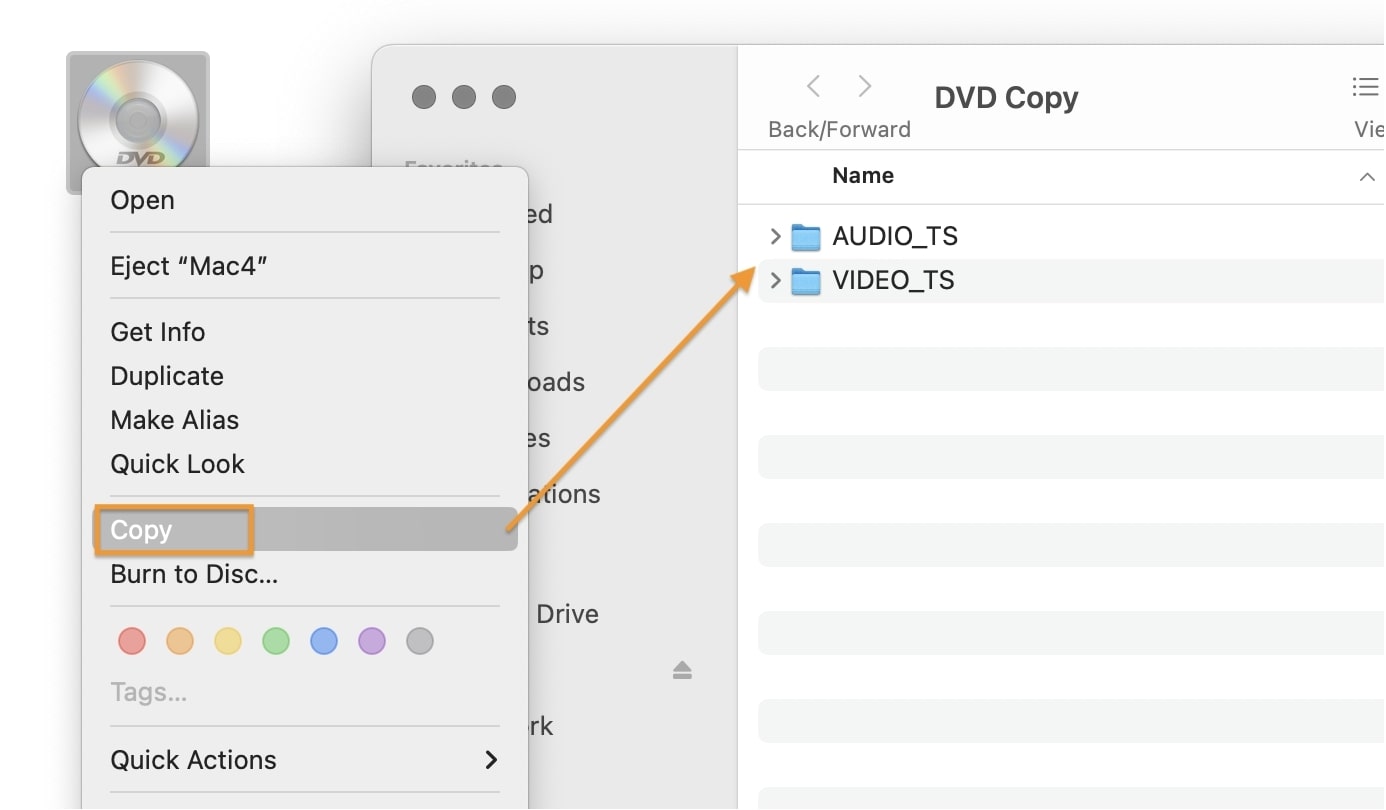
To play the copied DVD movie, you need to open the DVD Player app on your Mac, choose "File" > "Open DVD Media", then browse to the VIDEO_TS folder that contains the movie and click Open. But the copied DVD folder cannot be played with regular media players such as Quicktime Player. If you want to rip the DVD to common formats, use HandBrake to read the DVD and re-encode the DVD to MP4 files.
To copy DVDs with copy protection to your hard drive, USB, etc., you still need a third-party software that can rip and convert DVDs on Mac. MakeMKV Beta is a free option, but it can only rip DVD to MKV files, which are usually huge and not compatible with many video players. We recommend iFunia DVD Ripper as a better choice, as it can rip and digitize DVDs to all popular formats including MP4, MOV, MKV, AVI, MP3 and more.
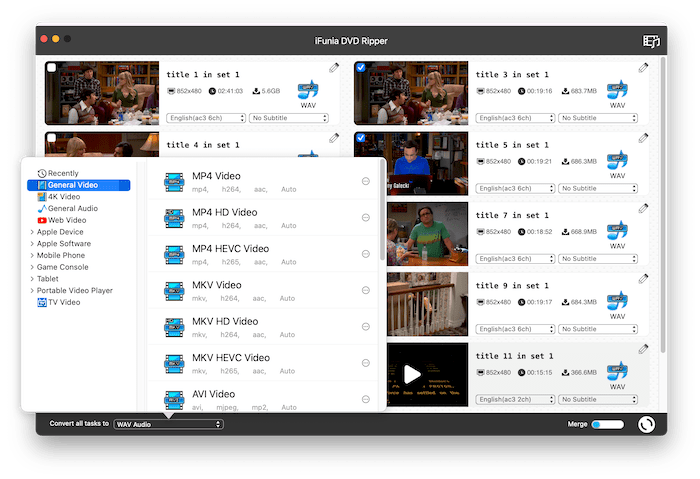
With this DVD ripper, you can compress the DVD video file size by adjusting video parameters, choose preferred audio track and subtitles, and edit or merge DVD titles if necessary.
By following these tested solutions, you can easily have your valuable DVD collections copied and backed up. Whether you want to make a physical or digital copy, the best method depends on the DVD type and your own purposes. For Mac users who frequently need to copy DVDs, iFunia DVD Copy can be a go-to option, ensuring a smooth and seamless copy experience.
Now it’s your turn to try copying DVDs on your Mac! And if you have any other questions, feel free to comment below.

Chloe LEE is good at explaining and solving complex technology problems to her readers. Since joining iFunia Studio, she has focused on writing articles about video and DVD software, and how-to tutorials.